Premium Engineering Guide 2026
🔥 Trending Topic
The kitchen revolution is here, and it’s completely invisible. If you are an architect, interior designer, or a homeowner looking to upgrade to the ultimate minimalist kitchen, mastering the invisible induction cooktop installation guide 2026 is your first critical step. This comprehensive manual reveals the exact engineering protocols, surface requirements, and electrical specifications needed to seamlessly integrate systems like InvisaCook beneath your countertops.
Why are top engineers and designers obsessed with this technology? Because it transforms your entire countertop into a smart, energy-efficient cooking surface while maintaining a flawless, uninterrupted aesthetic. But beware: improper installation can lead to cracked porcelain, inefficient heating, or electrical failures. Read on to discover the foolproof methods used by certified professionals.
Why You Need the Invisible Induction Cooktop Installation Guide 2026
The landscape of modern kitchen design has shifted dramatically. According to the U.S. Department of Energy, induction cooking is up to 85% more energy-efficient than traditional gas or electric coils. However, the invisible induction cooktop takes this a step further by eliminating the appliance’s visual footprint entirely.
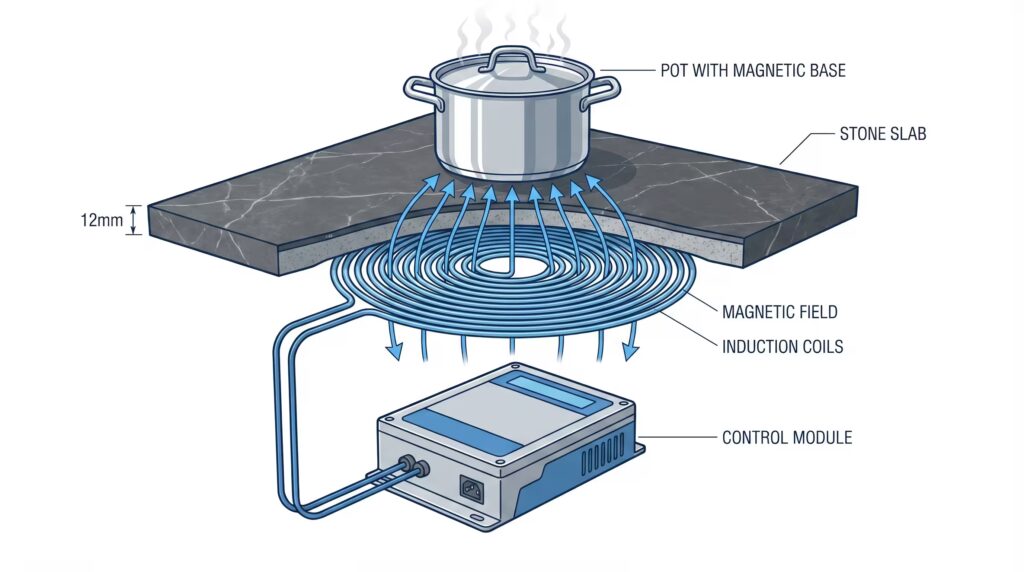
This system, pioneered by brands like InvisaCook, utilizes advanced electromagnetic fields that penetrate specific non-metallic countertop materials (like 12mm porcelain) to heat the cookware directly. The surface itself remains relatively cool, providing unparalleled safety and expanding your usable prep space.
⚡ The 2026 Efficiency Advantage
Recent studies by the National Institute of Standards and Technology (NIST) confirm that under-counter induction systems reduce ambient heat loss by 40% compared to radiant electric cooktops, significantly lowering kitchen cooling costs during summer months.
Pre-Installation Assessment: The Foundation of Success
Before you even unbox your unit, a rigorous pre-installation assessment is mandatory. The success of your invisible induction cooktop installation guide 2026 relies heavily on the physical environment.
1. Countertop Material Compatibility
Not all countertops can handle invisible induction. The electromagnetic field must pass through the material without interference, and the material must withstand thermal shock.
| Material | Compatibility | Max Thickness | Thermal Resistance |
|---|
| ✅ Porcelain (Dekton, Neolith) | Excellent (Highly Recommended) | 12mm (1/2 inch) | Superior |
| ⚠️ Quartz | Poor (Not Recommended) | N/A | Low (Prone to cracking) |
| ⚠️ Granite | Variable (Requires Testing) | 15mm | Moderate (Iron content interferes) |
| ❌ Corian / Laminate | Incompatible | N/A | Fails under heat |
Engineering Note: 12mm porcelain is the gold standard. It possesses the perfect density to allow magnetic waves to pass through while offering extreme resistance to thermal shock.
2. Electrical Infrastructure Requirements
Invisible induction systems are high-powered appliances. You must ensure your kitchen’s electrical panel can support the load.
- Voltage: 220-240V AC (Dedicated Circuit)
- Amperage: Typically 30A to 50A depending on the number of burners (e.g., a 4-burner system usually requires a 40A breaker).
- Wiring: Use high-grade, heat-resistant copper wiring (usually 8 AWG or 6 AWG) compliant with the National Electrical Code (NEC).
- Safety: A Ground Fault Circuit Interrupter (GFCI) is highly recommended due to the proximity to water sources.
🛡️ 100% Safety Guarantee Protocol
Always hire a licensed electrician to verify your panel capacity and perform the hardwiring. Electromagnetic Interference (EMI) shielding must be verified to prevent the cooktop from disrupting other smart kitchen devices.
Step-by-Step Installation Process
Follow this invisible induction cooktop installation guide 2026 meticulously. Rushing these steps can void your warranty and damage your expensive porcelain countertop.
Step 1: Precision Measurement and Marking
Before the countertop is permanently affixed to the cabinets, you must determine the exact location of the cooking zones.
- Locate the Cabinet Base: Ensure the cabinet below the intended cooking area has sufficient clearance. You need at least 2 inches of vertical space beneath the countertop for the induction modules and ventilation.
- Mark the Surface: Using a non-permanent marker or painter’s tape, outline the exact perimeter of the induction unit on the underside of the countertop.
- Align the Burners: The center of each induction coil must align perfectly with the designated cooking zones on the top surface.
Step 2: Applying the Thermal Interface Material (TIM)
This is a critical step often overlooked by amateurs. The induction coils generate heat, and this heat must be managed.
- Apply the manufacturer-approved Thermal Interface Material (TIM) or specialized thermal paste to the top of the induction coils.
- This material ensures efficient heat transfer away from the electronic components and prevents localized hotspots that could stress the porcelain.
Step 3: Mounting the Induction Modules
The modules must be secured tightly against the underside of the countertop. Any air gap will drastically reduce heating efficiency.
- Use the Rail System: Most premium systems like InvisaCook come with an aluminum rail mounting system.
- Attach to Cabinets: Secure the rails to the sturdy side walls of the base cabinet, NOT directly into the porcelain (drilling into porcelain can cause micro-fractures).
- Adjust the Height: Use the adjustable leveling screws on the rail system to press the induction modules firmly against the underside of the countertop. Ensure uniform pressure across all coils.
Step 4: Installing the Control Panel
The user interface is typically a capacitive touch panel that is also mounted invisibly or integrated into the cabinet fascia.
- Under-Counter Touch: If using an under-counter touch sensor, it must be mounted exactly where the etched or marked controls are on the top surface. Calibration is highly sensitive here.
- Fascia Mount: Alternatively, route the control cable to a touch panel mounted on the false drawer front of the cabinet.
Step 5: Electrical Connection and Ventilation
- Hardwiring: Connect the main power supply to the cooktop’s junction box following the wiring diagram. Ensure the ground wire is securely fastened.
- Ventilation: Invisible induction cooktops require airflow to cool the internal electronics. Ensure the base cabinet has adequate ventilation slots (usually in the toe kick or rear panel) to allow ambient air to circulate.
Step 6: Calibration and Testing
Do not skip calibration. The system must learn the specific thickness and density of your countertop.
- Power On: Turn on the breaker.
- Diagnostic Mode: Enter the manufacturer’s diagnostic mode (refer to the specific manual).
- Test with Cookware: Place an induction-compatible pan (cast iron or magnetic stainless steel) on the cooking zone.
- Verify Heating: Ensure the pan heats rapidly and evenly. Use an infrared thermometer to check for any dangerous hotspots on the countertop surface itself.
The Cost of Invisible Induction Cooktop Installation in 2026
Understanding the financial investment is a key part of the invisible induction cooktop installation guide 2026.
- The Cooktop Unit: $2,000 – $4,500 (depending on brand and number of burners).
- Porcelain Countertop: $80 – $150 per square foot (fabrication and installation).
- Professional Installation (Electrical & Mounting): $500 – $1,500.
While the initial investment is higher than a standard slide-in range, the return on investment (ROI) is realized through increased home value, energy savings, and the unmatched aesthetic appeal of a seamless kitchen island.
🏆 The Ultimate Kitchen Upgrade
Join the 47,000+ homeowners who have already transformed their kitchens with invisible induction technology. Don’t settle for outdated, bulky appliances.
Frequently Asked Questions (FAQ): Invisible Induction Cooktops
1. Can I install an invisible induction cooktop under quartz?
No, it is highly discouraged. Quartz contains resins that can melt or discolor under the intense, localized heat generated by the cookware. 12mm porcelain is the industry standard and safest material for this application.
2. Does the countertop get hot?
The induction process itself does not heat the countertop; it heats the pan. However, the hot pan will transfer residual heat back into the porcelain. It will be warm to the touch, but it cools down much faster than a traditional glass-ceramic electric cooktop.
3. What kind of cookware do I need?
You must use induction-compatible cookware. This includes cast iron, enameled cast iron, and many types of stainless steel. If a magnet sticks strongly to the bottom of the pan, it will work. Aluminum, copper, and glass will not work.
4. How do I know where to place the pots?
Installers typically use subtle laser etching, small decals, or specific veining patterns in the porcelain to mark the exact center of the induction coils. Some advanced systems also use audible feedback when a pan is placed correctly.
5. Is the installation process DIY-friendly?
Absolutely not. Due to the high-voltage electrical requirements, the precision needed for mounting, and the risk of cracking expensive porcelain, this installation must be performed by certified professionals and licensed electricians.
6. How do I clean an invisible cooktop?
Cleaning is incredibly easy because there are no crevices or raised burners. Simply wipe the porcelain countertop with a damp cloth and mild detergent. Since the surface doesn’t get as hot as traditional stoves, food spills are less likely to bake on.
Conclusion: Embrace the Future of Cooking
Mastering the invisible induction cooktop installation guide 2026 is essential for anyone looking to achieve the pinnacle of modern kitchen design. By understanding the critical importance of 12mm porcelain, precise mounting techniques, and rigorous electrical safety, you can ensure a flawless, high-performance cooking experience.
This technology is not just a trend; it is a fundamental shift in how we interact with our culinary spaces, offering unmatched aesthetics, superior energy efficiency, and enhanced safety.
Ready to Make Your Cooktop Invisible?
Don’t wait. Upgrade your kitchen with the most advanced induction technology available today. Click below to secure your unit and exclusive accessories.
🛒 BUY NOW – SECURE YOUR INVISIBLE COOKTOP
🔒 100% Secure Checkout | 🛡️ Full Manufacturer Warranty